Dyeing with acorns
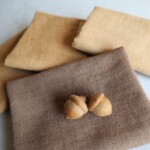
Acorns provide a wonderful range of tans, browns, and blacks, when used as natural dye. Learn how to extract dye from acorns, and use it to achieve a beautiful natural color!
Equipment
- Large dye pot
- Long wooden spoon
Materials
- Acorns
- cotton, linen or wool fabric, or yarn
- iron solution or iron powder (optional)
Instructions
Gather the acorns
- I generally use my biggest dye pot, and fill it ⅔ full with acorns – using at least twice the volume of acorns, as the volume of the fabric that I intend to dye.
Simmer acorns to create a dye bath
- Put the acorns in your dye pot, and more than cover them with water. They’re going to absorb water and swell, so you’ll want the water to start out at least an inch or two deeper than the level of the acorns.
- Heat the dye bath over low heat, until it’s lightly simmering, and allow it to simmer for 20 minutes. Turn off the heat, and let the acorns sit in the dye bath for 24 hours.
- After 24 hours, bring the dye bath back to a slow simmer, and simmer for another 20 minutes.
Strain the dye bath
- Now, you’ll need to strain off the dye bath so you don’t have any bits of acorn in your final dye. I find that the easiest way to do this is to pour the whole thing through an old sheet, into a clean 5 gallon bucket. Wash out your dye pot to remove bits of acorn that might be clinging to the sides. Pour your strained dye bath back into the dye pot, and return it to the stove. Bring it back to a low simmer, and then turn off the heat.
Add fabric or yarn to the dye bath
- Add your fabric or yarn to the dye bath, making sure that it’s fully immersed, and has room to move freely when you stir it. If the dye bath just barely covers the fabric, add enough water to so that you can stir it freely. This will help prevent uneven dyeing.
5. Create an iron bath to darken the final color (optional)
- To further darken fabric or yarn, use an iron bath to finish the dyeing process. Start by removing your fabric or yarn from the dye pot. Set it aside while you introduce the iron to the dye bath.
- You will want to thoroughly read the more detailed instructions included in the post, on creating a dye bath using either an iron solution, iron powder, or an iron pot. In brief, either add a small amount of iron solution (start with ½ teaspoon), or iron powder (start with ⅛ teaspoon) to your dye bath and mix thoroughly. OR pour the acorn dye bath into an iron pot, simmer for 10 minutes, then remove from heat.
- Add your fabric or yarn to the dye pot, and stir to ensure even dyeing as you keep a close eye on it. It shouldn’t take long to start darkening. When it reaches a shade you like, go ahead and remove it from the dye bath.
Dry the dyed fabric, and let it rest (optional)
- To help improve lightfastness and longevity of your natural color, allow the fabric or yarn to dry. Then let it sit, undisturbed and out of directly sunlight, for 2-3 days before rinsing it clean. I find that when I allow fabric to cure like this, my natural dyes last much longer than when I rinse them immediately after dyeing. This difference is not as noticeable with acorn dye as with other plant dyes (acorn dye is pretty lightfast anyway), so you may choose to skip this step. However, after a few years of working with acorn dye, I do feel my "cured" acorn-dyed articles hold onto their color more vividly, so it's something I always do. One exception to this…iron is hard on fiber, and especially so on wool. If you’ve darkened your fabric with iron, you might want to consider skipping ahead to the rinsing step. I still cure my acorn-dyed fabrics that have had a brief iron bath, and so far have not noticed any weakening or increased fragility of the fabric, but you may want to err on the side of caution. If you’ve darkened wool yarn with iron, I’d definitely suggest skipping the cure time, and going straight to rinsing.
Wash and dry the finished fabric or yarn
- Immerse yarn or fabric in cool water, and rinse thoroughly until the water runs clear. If working with fabric, I often do this step by using the gentle/small setting on my washing machine, and using cold water.Once your fabric or yarn is fully rinsed, you can dry it. If using a clothesline, try to limit the time plant-dyed items spend hanging in strong sunlight, to help prevent fading.