Christmas Tree Scented Beeswax Candles
These beeswax candles are quick and easy to make, and they smell just like walking through a Christmas tree farm! Made with essential oils and natural beeswax, they're much more healthful to burn in your home than candles scented with fragrance oils.
Equipment
- Pourable candle-making container, or large heat-proof container with pour spout
- Saucepan, or bottom of double-boiler
- Candy Thermometer that will read down to 100°
- Stirring spoon
Materials
- 12 ounces beeswax
- 3 ounces coconut oil
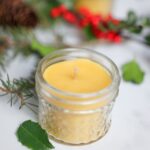
- 5 4-ounce mason jars
- 5 wicks with bases
- 40 drops fir needle essential oil
- 20 drops pine or spruce essential oil
Instructions
Melt the wax
- Start by adding the wax and coconut oil to your heat-proof container.12 ounces beeswax, 3 ounces coconut oil
- Over the bottom of a double-boiler, or saucepan with a few inches of water, melt the wax over medium-low heat. Stir occasionally.
- Once wax is fully melted, it needs to cool down below the essential oil's flash point (100°F for Fir, 104°F for Pine). While the wax cools a bit, prepare your candle jars.
Prepare the candle jars
- Adhering the wick's base to the bottom of the jar helps the wick to stay correctly centered in the jar as the candle is poured. To do that, dip the metal base of each wick into the melted wax, and immediately press the base onto the center bottom of the jar. (It's not as hot as you think it is!)5 4-ounce mason jars, 5 wicks with bases
- If your wicks want to flop over instead of standing nicely, you can use a candle wick holder, or just a pencil or twig on each side of the wick to hold it upright.
Add Essential oils, and pour the candles
- Once the wax mixture cools to under 100°, you can add your essential oils. (This is the part of the process where you'll move quickly.) Add your essential oils to the wax, and stir throroughly to incorporate.40 drops fir needle essential oil, 20 drops pine or spruce essential oil
- Immediately wipe off your spoon while it's hot, for easy cleaning.
- Now, pour your candles smoothly and steadily. This recipe makes enough wax to fill each jar just about exactly to the widest ridge on the jar, at the base of the threaded lid area.
- Check your wicks to make sure they're standing straight in the center of each candle. Remember, the candle cools from outside in, so you have time to fix each wick if they've flopped a bit.
Trim wicks and label the candles
- Trim the wicks even with the top of the jars.
- Once candles are completely cool, you can replace the lids, and label them if you like. I love using these round "craft paper" labels, for their natural look.
How to burn a beeswax jar candle
- I've tested these candles really thoroughly, and find that they hold up well to being burned for both short and long periods. To help your candle last and burn well, these two tips help: 1. Before lighting, be sure wick isn't longer than ½". If it is, trim it to ½". 2. Don't pour off any melted wax once the candle has been burning. This will cause it to burn less evenly next time. Allow melted wax to re-harden after burning the candle, and it will hold up to being used multiple times, burning nicely until the last drop of wax is gone.