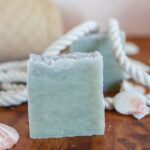
Eucalyptus, Fir, and Nettle Hot Process Soap Recipe
This easy homemade soap is extra soothing to the skin, because of the nettle-infused olive oil! With a good lather, and bright, cooling scent, it's one of my favorite summer soaps for freshening up after a day at the beach or in the garden!
Yield: 10 soap bars
Equipment
- Crock Pot
- Soap mold
- kitchen scale
- Immersion blender
- safety glasses
- long latex gloves
- non-reactive stirring spoon
- non-reactive measuring containers
Materials
- 12 ounces coconut oil
- 12 ounces nettle infused olive oil (SEE NOTE BELOW)
- 4 ounces shea butter
- 4 ounces castor oil
- 12.16 ounces water
- 4.61 ounces lye (sodium hydroxide)
- 1 ounce Eucalyptus essential oil
- .75 ounce Fir essential oil
- 2 capsules activated charcoal (or about ½ tsp)
Instructions
Prepare your workspace
- As with all soapmaking sessions, prepare by clearing your workspace and ensure that you have abundant clear counter space. Don't allow pets or children to wander through your work area.
Making this hot process soap recipe
- Start by putting all of the oils/butter into the crockpot. Set it to LOW, and allow it to warm until all of the oils are melted. The shea butter will take longest to melt, and you can give it an occassional stir to help it along.
- Weigh your water into a heat-safe, non-reactive contatiner, with plently of additional room to mix in the lye.
- In another non-reactive container, weigh out the correct amount of lye.
- Slowly pour THE LYE INTO THE WATER (never the other way around), stirring slowly until all of the lye is fully disolved into the water. The lye mixture will immediately begin to warm up. (Unlike with cold process soap, you don't have to wait for the lye mixture to cool to a certain temperature. As long as all of the oils are fully melted, you can actually pour the lye into the oils as soon as it's mixed.)
- Carefully pour the lye mixture into the melted oils.
- As soon as the lye is poured into the melted oils, use an immersion blender to bring the lye and oil mixture to trace. When the mixture reaches trace, you'll know, because it will look like vanilla or butterscotch pudding. When you lift the immersion blender, it will leave a gentle peak in the mixture, and any drops will linger on the surface as little blobs. It REALLY looks like pudding.
- Put on the lid of the crock pot, and let the mixture cook. You'll see the mixture start to get translucent around the edges and start to "crawl" up the side of the crock pot. Definitely give it a stir if it threatens to flow over the edges, and it doesn't hurt to give it the occassional stir even if it doesn't.
- The soap needs to cook until until it's no longer caustic, which takes about 40-50 minutes. It will go through several phases - translucent around the edges, then lumpy and cloudy looking (I've hear this called the "mashed potato stage" and it's really what it looks like!) Then the soap will start to get translucent again. It's a good idea to give the whole thing a stir about once every 10 minutes, to keep it all cooking evenly.
- When the soap starts to get evenly translucent again, you can go ahead and test it. I use the "zap test", recommended by Heidi at Healing Harvest Homestead. Take a little bit of soap between your fingers, and rub it around. Does it feel waxy? If it's feeling waxy, go ahead and touch your tonge to it. If it "zaps" and tingles your tounge, it's not quite done yet, and needs to cook a little longer. If it just tastes like soap. You're ready.
- Once the soap is done, go ahead and turn off the crock pot and remove the lid. Let the soap cool for 5 minutes. You want a little of the heat to escape before adding the essential oils, so they don't burn off.
- Add the essential oils and contents of the charcoal capsules. Still well until the mixture is evenly blended.
- Now, lift the soap mold and firmly thump it on the counter several times to release any bubbles, and help the soap settle well into every corner of the mold. (I truly THUMP it really hard on my countertops - it's not very graceful, but does an effective job at getting good solid bars of soap!)
- Now, let the soap just sit and cool for at least 8 hours, before unmolding it. If you really need to rush it, you can put it in the fridge, and get away with unmolding after about 4 hours.
- While the soap is technically read to use right away, I like to let it sit and harden for about two days after it's unmolded, before slicing the soap loaf. Then, once it's sliced, I usually let the bars of soap sit for another day or two to harden up a little more, before I package them. That said - there's no rush to cut your loaf of soap, and it's actually a great way to store the soap if you're not using right away. You can just leave it as it is, and slice of bars of soap as you need them.
- To make your bar soap last well, be sure to use a well-draining soap dish that lets your bar dry in between washings. Sitting in a puddle of water drastically reduces the life of your soap. Enjoy!
Notes
TO MAKE THE NETTLE-INFUSED OIL:
Long method: In a glass jar, pour 12 ounces of olive oil over 3 ounces of dried nettle. Cover lightly and let sit in a dark, room-temperature place for 2 weeks.
Quick method: Instead of letting the oil and nettle mixture sit at room temperature, set the jar uncovered in a crock pot set on WARM for about 8 hours, until oil takes on a greenish hue. (If you're really in a hurry, you can set the slow cooker to LOW, for two hours, but I prefer the results with the longer, lower-temp method).
Once the oil is infused: Strain the oil through two layers of cheese cloth, or through a fine-meshed strainer, giving a little squeeze or press to extract as much oil as possible.
WEIGH your oil, and if necessary (it almost certainly will be) add a little extra olive oil to bring the volume up to the 12 ounces called for in this recipe.
You can also use a larger volume of oil (14 ounces or so) when setting the oil to steep, so that topping up isn't necessary. For me, not having space to store little odds and ends of extra infused oils, I tend to infuse only the amount necessary for each batch, and top up as needed, so I don't end up with extra.