

It's so easy to root elderberry cuttings and affordably start your own elderberry patch. Follow these simple steps for good success with taking cuttings and getting them to grow!
If you've been following me on Instagram, you may have noticed that I got an exciting package full of elderberry bush cuttings this week! I've been wanting to add elderberries to our back garden area for some time, and this is the year.
So many folks reached out with questions about my process for rooting these, that I thought I'd go ahead and write up a post about it, to share the method I'm following. I don't usually write a "how-to" type of post until I've done something many times and feel a lot of confidence about my techinique, and this is my first time rooting elderberry cuttings, so please consider this a "tips from the trenches" kind of post. I'll look forward to updating this as the cutting grow!
I chose to purchase elderberry cuttings rather than rooted bushes, because cuttings are such a cost-effective way to start a patch of elderberry bushes. For much less than the cost of one elderberry bush, I now have six young plants getting started, that I'll be able to plant out in the spring.
Where to get elderberry cuttings
To root elderberry cuttings, you need to start by getting your hands on some good dormant cuttings. You can take your own cuttings if you have an established bush available to you, or purchase them online.
Taking your own cuttings
If you're fortunate enough to have access to a good elderberry bush (and permission to cut from it, if it's not your own), you can take your own cuttings for rooting. Cuttings should be taken in the winter, when the plant is dormant. It's ideal for the cutting to come from robust first or second year canes.
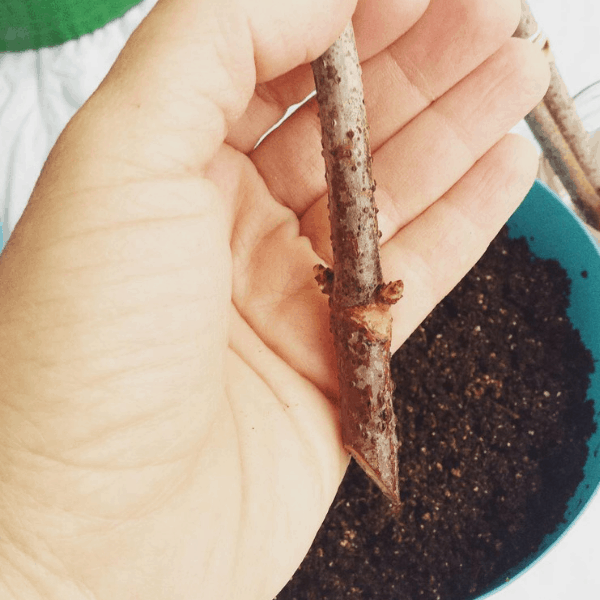
Using sharp shears, make your cut at an angle, slightly below a pair of leaf nodes. Around those leaf nodes is where the roots will start to emerge, so you don't want to make your cut too close. You want two sets of leaf nodes on each cutting - one will be below the soil to allow for root development, and the other set will be above the soil for leaf development. Follow up the branch that you've just cut, and make another cut about an inch above the next set of leaf nodes - this time flat across. If your branch is long, you may be able to get a few cuttings out of just one branch.
If you're not able to start rooting your cuttings right away, put them in a sealed plastic bag in the fridge until you're able to work with them.
Ordering cuttings from a nursery or grower
If you're not able to take your own cuttings, or you'd like to add a variety to your collection that's not available locally, you can very affordably order cuttings online. Here are a few places that offer elderberry cuttings of various varieties.
I ordered my elderberry cuttings from Norm's Farms this year, and I just couldn't be more pleased. The shipping was almost unbelievably fast, and they very generously included extras of each variety I ordered. The cuttings were clearly from young, robust wood, and had lively-looking leaf nodes just clearly full of vigor.
These folks offer a bundle of 10 cuttings of a variety of cultivars for $20, making it an incredibly inexpensive way to get a large patch of elderberry bushes started.
River Hills Harvest offers 4 excellent varieties at very affordable prices, and they also offer larger quantities of certified organic cuttings, which can be helpful if you're looking to start an organic market-scale elderberry operation.
Rooting elderberry cuttings
Start with a 24 hour soak
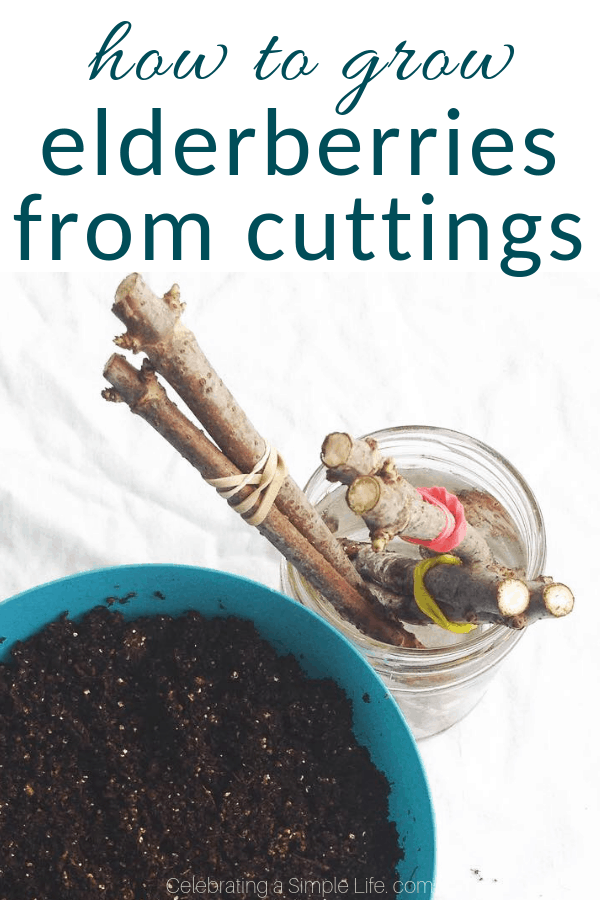
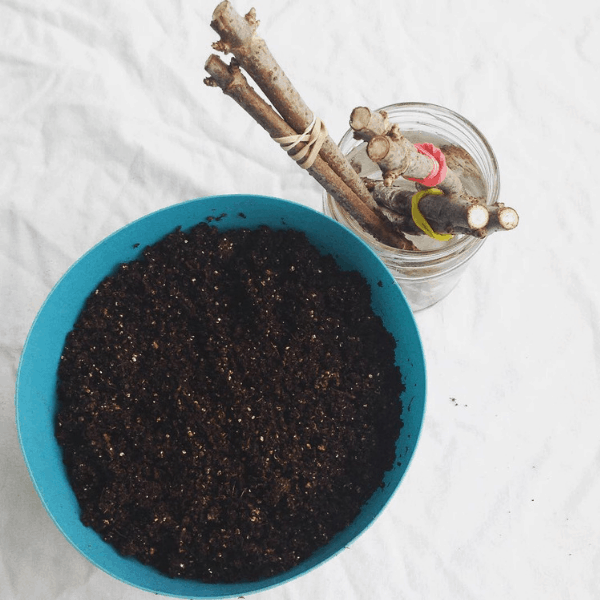
When you receive your elderberry cuttings (or pull them out of cold storage), start by soaking them in cool water for 24 hours. Make sure the lower set of leaf nodes (the end with the angled cut) is completely submerged. Making sure the cuttings are well hydrated will benefit the rooting process.
Fill plant pots with an appropriate potting mix
Fill a fairly deep pot with a light potting mix - Norm's Farms suggests regular potting mix, coconut coir, or blends such as a mixture of one part peat and one part Perlite, or one part peat and one part sand.
If you're rooting many cuttings, it might actually be easiest to half-fill a clear Sterilite tote with potting mix, so that you have room for all your cuttings in one container, and can use the lid to retain a good level of humidity while the cuttings are rooting.
Dip in rooting hormone (optional)
Elderberries root easily - cuttings are even sold in large quantities as "live stakes" for pounding directly into damp ground, where they put down roots and grow as a naturalizing element for large landscape areas. Most propagators seem to agree that while rooting hormone can increase success rates and speed up the rooting process, it's not truly a necessity for rooting elderberries, so this step is optional.
Because I keep rooting hormone on hand and have had great results using it with difficult-to-root species, I did go ahead and use it with my elderberry cuttings. Any rooting hormone should give you a good result.
If you're maintaining organic certification however, or seeking to obtain it, your options for a rooting stimulant are very limited. If you'd like to give your cuttings an extra edge with the rooting process, willow water contains a natural rooting stimulant, and can easily be made at home. This article tells how to make homemade willow water for rooting cuttings.

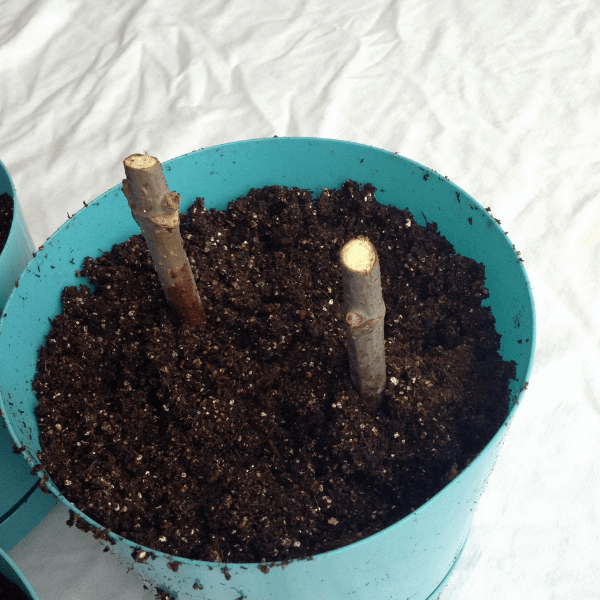
Plant in an appropriate potting mix
Using a chopstick or a pencil, make a deep little hole in the potting mix for each cutting. You don't want to scrape off the rooting hormone as you push the cutting into the soil, so "pre-drilling" a hole helps allow the hormone to stay on. Place the cutting in the hole, and gently firm the soil around it. The upper set of leaf nodes (the end with the flat cut) should be clearly above the soil - these need to be able to leaf out as the plant becomes established.
Water the cuttings so the potting mix is thoroughly dampened.
Choose a rooting location carefully
Now that the cuttings are potted up, it's important for them not to dry out, and to stay cool as their roots develop. Choose a location that's not in direct sunlight, and stays fairly cold. The folks at Norms Farms recommend 40 degrees as the ideal temperature for encouraging root growth. Check on them frequently to make sure the soil stays lightly damp. "Tenting" the cuttings by placing a plastic bag over the pot to maintain humidity can help prevent the cuttings from drying out.
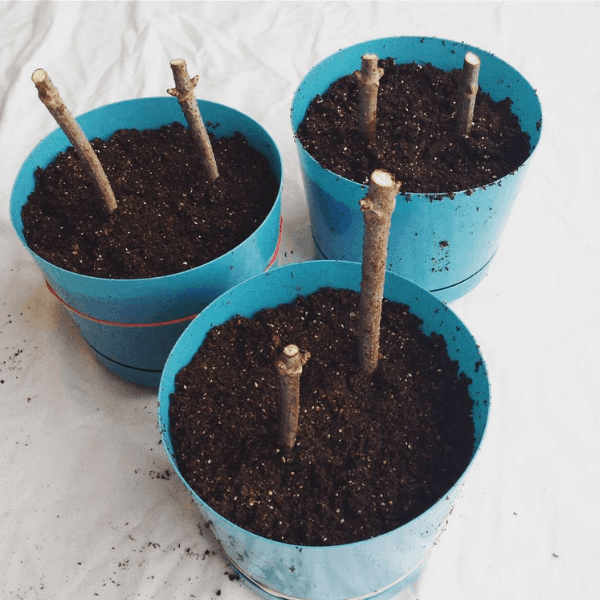
Within 6-8 weeks, there should be good root development happening. In less than three months, new shoots should be growing good and strong, and plants should be ready for planting out in their permanent locations.
What makes a good location for an elderberry bush?
Elderberries grow best in full sun - at least 6 hours of sunlight per day.
Soil should be loose and well-drained, not overly sandy or heavy. If the soil where you're planting them is poor, it's definitely worth working in plenty of good compost before planting your new bushes.
Elderberries need a fair amount of space, and should be planted 6-8 feet apart, or a bit closer if you're creating a hedgerow.
Growing near other elderberry varieties will improve the harvest. While elderberries are considered "partially self-pollinating", harvests are significantly improved by growing them with another cultivar nearby.
I'm looking forward to coming back and updating this post with some photos of our elderberries planted out in their permanent locations! I hope this helps answer some of the many questions I've received about how I'm rooting our elderberry cuttings this year, and if you still have any questions, please feel free to ask away in the comments!
Happy growing!

Anna Chesley
Anna Chesley is a freelance writer living a homestead lifestyle, with a special love for family travel, old books, vintage skills, and seaside living. In addition to founding Salt In My Coffee, she runs the website, New England Family Life, as well as The 1800's Housewife, a website devoted to re-creating authentic 1800's recipes.


karl richard says
An interesting article!
I noticed the the picture of the book (?) has a typo error: CUTINGS !
Anna Chesley says
Thanks for the sharp eyes, Karl!
Regina says
How are you elderberry bushes doing?
Anna says
Hi Regina! They're doing wonderfully and seem to be wintering over well!! I'm SO looking forward to our first real elderberry harvest this year!
russell glerum says
I just received 100 cutting from River Hills Harvest. I started 7 cutting in water on 2/11 and 7 more on 2/12. On 2/13 I will start 7 in potting soil with rooting hormone. Then I plan to wait 3 weeks and which either method works best I will start the remaining 79 cuttings.
Regina says
I would value your "test" results. I have 6 cuttimgs. Not sure which method I should use. River Hills suggests both methods.
Kathi says
Thank you for this post and for the resources for cuttings that you included. I've been wanting my own elderberry plants for years. Found you on the Chicken Chick's blog hop.
Anna says
Thanks so much for the kind words, Kathi! I'm having SO much fun watching these cuttings take off, and wish I'd know years ago how cheap it could be to start plenty of elderberry bushes this way. Thanks again!!