


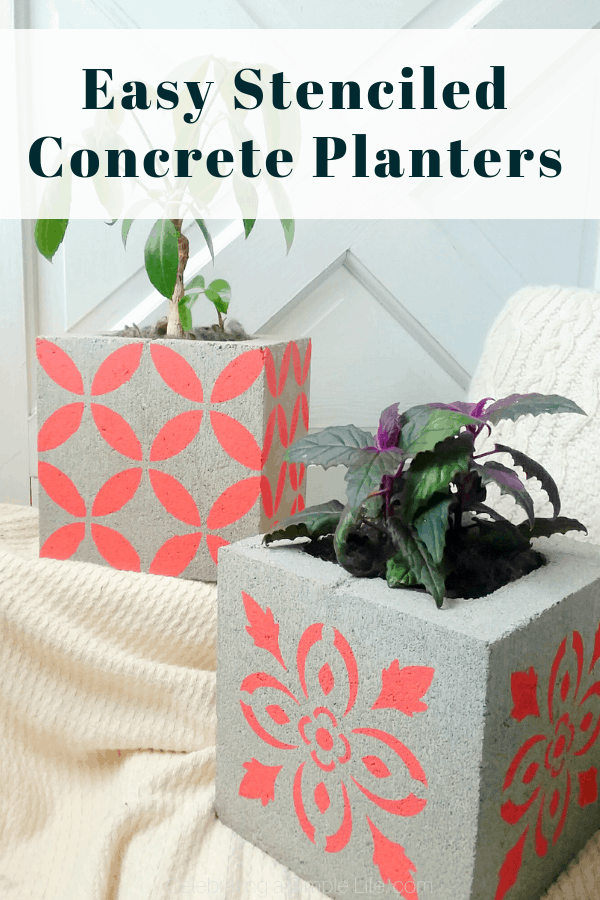
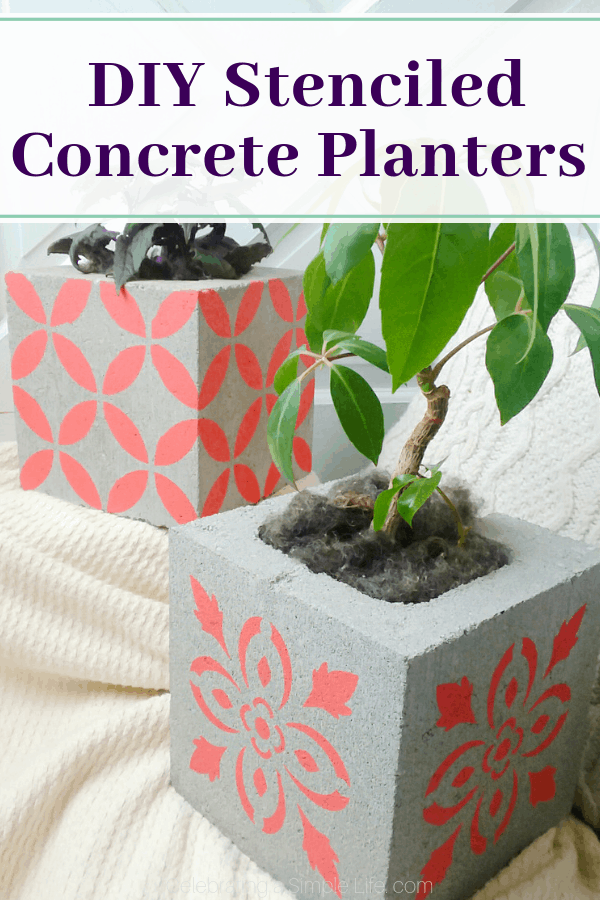
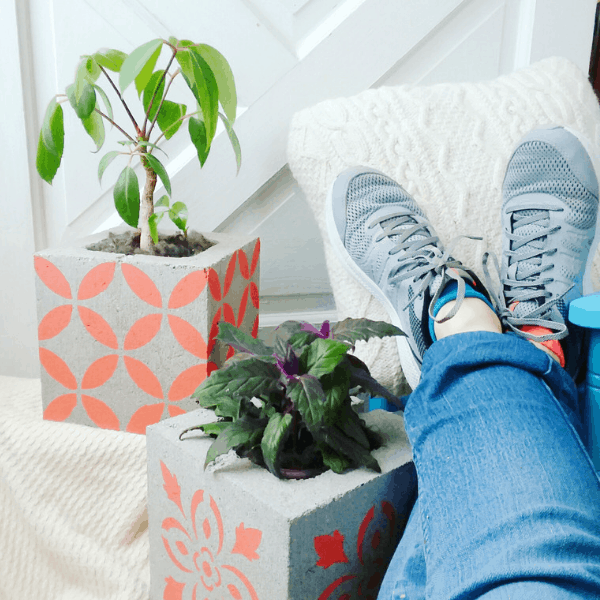
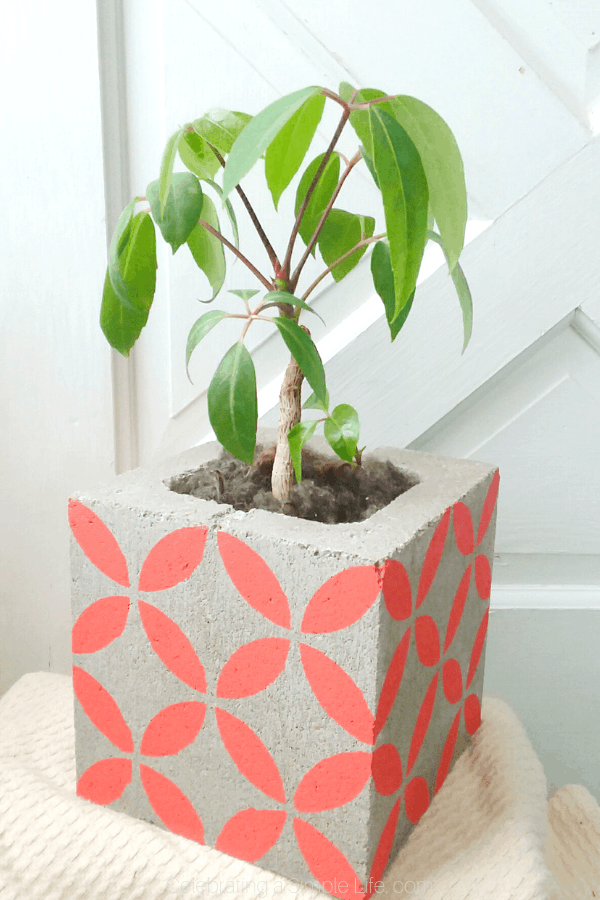
These stenciled concrete block planters are sturdy, chic, and easy!! They also feature a bottom with a drainage hole, so plants can thrive and be moved, without losing soil out of the bottom. For a quick and inexpensive patio update, give these stenciled cinder block planters a try!
As I write this, there's a frigid wind moving in, and old man Winter seems to be tightening his grip on our little piece of countryside here in the Maine foothills. The thermometer has dipped back into the single digits, and I'm huddled once again by the woodstove. But three days ago? Just three days ago it was 50 degrees outside, and I was hauling wood in my shirtsleeves. That's New England for you.
I've already had spring fever for weeks, so as the weather turned arctic again, I knew I needed a little springtime DIY to lift my spirits. These bright and cheerful concrete planters were just the thing!
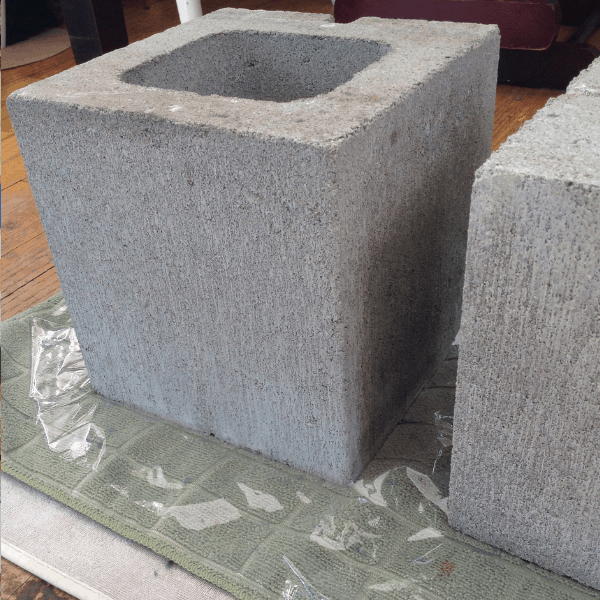
Turning concrete blocks into cute housing for plants honestly isn't a novel idea, but unfortunately, cinder blocks lack something all good planters have - a bottom.
Most tutorials I've seen simply forgive this shortcoming, and recommend setting the plant into it, pot and all. Or filling the planter with dirt, potting up your plant, and...not moving it. Ever.
The few solutions that did address the problem called for things like stuffing the bottom of the hole with bunched up chicken wire (ouch!) or gluing a vent cover onto the bottom. The vent cover idea is actually pretty good solution, but I knew I wanted my planters to sit flush with the floor, step, or ground, and something glued onto the bottom doesn't allow for that. So I decided to fiddle around and come up with my own solution.
What I settled on, was simple pouring my own concrete base into each block, using a plug to create a drainage hole in the finished planter. I love how they came out, and am finding them to be sturdy and functional, as well as cute! Here's how to make them.
How to Make Stenciled Cinder Block Planters
Disclosure - all stencils featured in this project were received free of charge from Stencil Revolution, in exchange for my honest review. All thoughts and opinions expressed herein are my own.
Materials List:
- 8" x 8" concrete blocks (like these)
- Quickrete concrete mix (you'll just need 1 cup for each planter, so a small bag will do!)
- 2T beeswax or an old crayon, for each planter
- Disposable container (large yogurt tubs are perfect!)
- Something to mix with like an old fork, or latex glove so you can mix by hand
- 1 cup measuring cup
- 1T measuring spoon
- Water
- Stencil to fit nicely on your 8x8 surface (This place has my favorite stencils!)
- Paint (If these are going to live outside, you may want to choose an exterior paint)
- Stencil brush (like these, but I just borrowed my kids' biggest brush from this set)
- Masking tape or painters tape
It looks like a lot of supplies, but chances are - you've already got all of this, or something that will work. The concrete blocks, concrete mix, and stencil are likely the only items you'll have to get specifically for this project.
Step 1: Pour the bases (optional)
If you happen to be using these planters for faux plants, or if you're just setting an already-potted plant inside the planter, you might be happy to skip this step. If you're potting a plant directly into these though, there are two huge benefits to taking the time to pour a base into your cinder block. First, you won't lose bits of soil seeping from around the base of the planter every time you thoroughly water your plant. And second, you'll be able to move your plant without losing soil (and possibly plant!) out of the bottom.
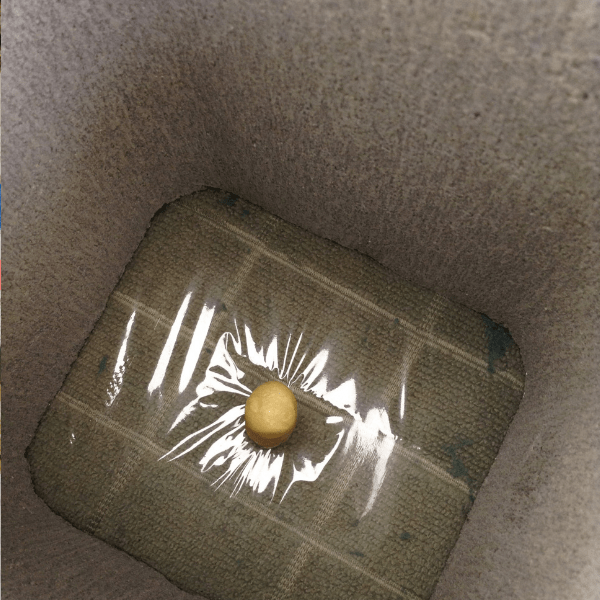
Pouring the base is easy. Start by laying an old towel on a flat surface. Cover this with a layer of plastic wrap.
A concrete block has a slightly larger opening at one end than the other. Find the end with the larger opening on yours - this end is up. Set the concrete block on the plastic wrap, with the narrow opening down, and the wider opening up.
If you want a drainage hole in the bottom of the planter, you'll need something in the center of the block to hold space for the hole when you pour the concrete. I'm sure there are more elegant solutions to this, but here's what I came up with, and it worked really well.
I softened a bit of beeswax over the stove, and made a little plug about the size of my thumb, for each planter. Working over the planter, I briefly held a match under the wax plug to re-soften it just enough so it would adhere to the plastic wrap when I firmly placed it in the center of the planter. And old crayon would work too, just remember that you'll be melting this plug out of the concrete base, so a crayon might leave colored wax residue on the bottom of your planter. With a plug in place, you're ready to pour some concrete.
To mix the concrete, you'll want a disposable container, like a large yogurt or cottage cheese tub. Put 1 cup of concrete mix into your mixing container. Add 3 and ½ tablespoons of water to the concrete mix. (Yes, you're laughing at me right now, but if you've read my recipes, you already know I have a tendency toward using awkwardly-precise amounts!)
Stir the concrete mix and water until they're very thoroughly combined. It should be damp enough to look loose and wet, without being runny, and definitely not crumbly. Working from the corners, toward the plug, dump the wet concrete into the bottom of the planter. (You don't want to knock over the wax plug with a direct hit from a heavy gloop of concrete.)
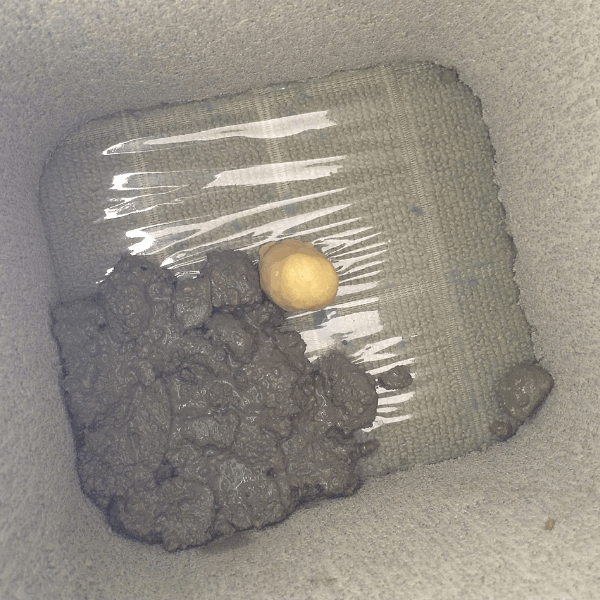
Smooth and tamp down the concrete - I used an old fork, but putting on latex gloves and using your hands works well too. Let it set, undisturbed, for about 12 hours. Then turn the planter on its side, or even upside down, and let it stay there for another 12 hours or so.
Looking at these long directions, this sounds like so much more of a project than it really is! But I promise, once you get going, it's SO fast. I poured my bases during naptime and still had time for a quiet cup of tea.
To melt out the wax plugs, set the block up on a couple of bricks or something, to give access to the bottom of the planter. Then it's easy to just hold a match or candle underneath and let the wax run out as it melts. You'll soon have a perfect drainage hole, and be ready for the fun part - PAINTING!
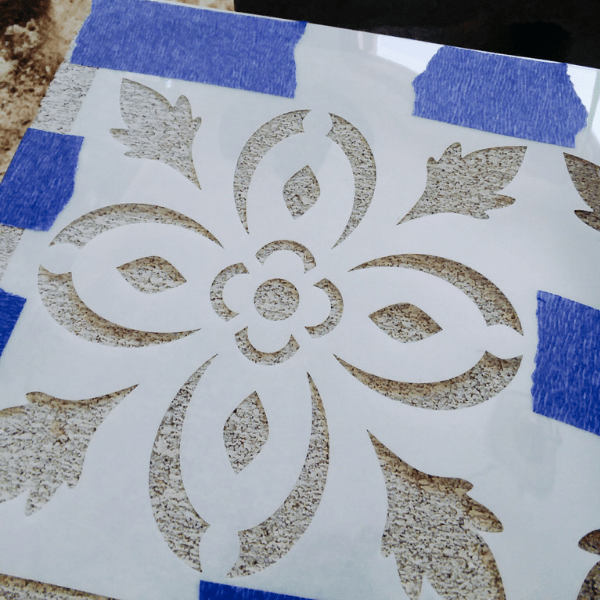
Step 2: Stenciling the planters
Want to know what I think is hands-down the hardest part of this whole project? Choosing which stencils to use! When Emily at Stencil Revolution reached out to see if I'd like to try some of her amazing stencils, I took a peek at her shop to see what she had. Holy cow! I had a pretty good idea what look I was going for with this project, and it still took me an hour to decide, because I wanted all. the. stencils.
Here are the exact stencils I used for this project:
The Orion Stencil , in size 6”x6"
The Japanese Tile Stencil , in size 8"x8"
Some others I thought would be adorable on a planter were the dragonfly, sunflower, fleur de lis, and octopus designs.
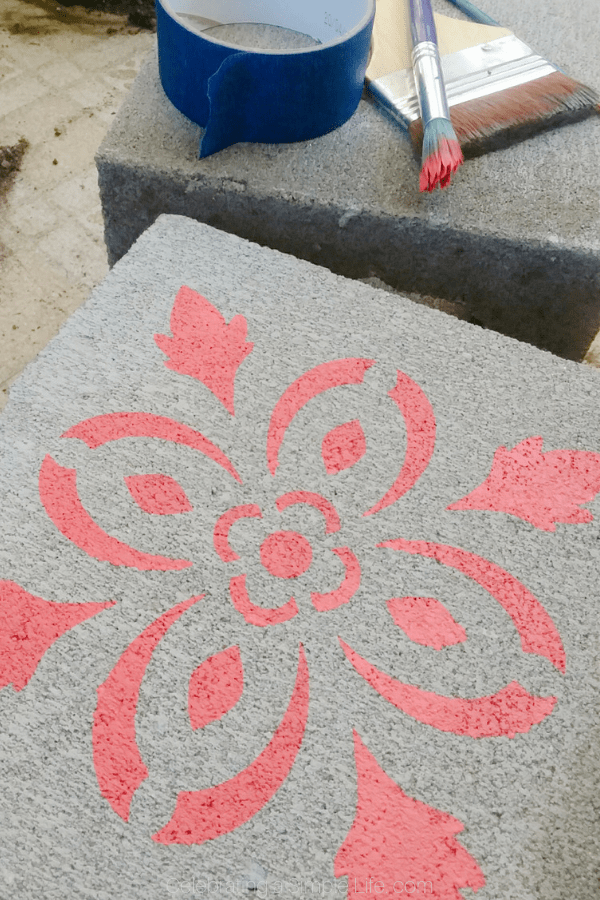
To stencil the planter, lay it on the side. Keeping in mind which end of the planter is up, place your stencil, and tape down the edges. Using a fairly dry brush, paint within the stencil openings. Especially where concrete is not a very smooth surface, I like to use a gentle up-and-down dabbing motion, always working from the edges of each stencil opening, toward the centers.
Keeping an old rag nearby is handy, in case you end up with too much paint on your brush.
The trick to good clean edges in your pattern is applying small amounts of paint at a time, keeping your brush dry and bristly-looking. You don't want a drippy, wet brush.
Angle your brush away from the cut edges of the stencil openings as you work, keep a dry brush, and you'll end up with a perfect result every time.
Once you're done painting one side, you can carefully remove the stencil, wash and dry it, then move on to the next side. When all sides are painted, you're done! Let it dry, plant something fun in there, and enjoy your new planter!
That's all there is to it! I hope if you make these, you'll drop a line and let me know. I'd love to see pictures of your finished planters!
Happy painting!
Read Next: DIY Painted Windowsill Pots
If you liked this post, you may enjoy:
✦ Wood-Burned Twig Plant Markers
✦ Growing Asparagus From Seed
✦ Free Printable Seed Packet Template
✦ How to Prune Blackberry Bushes
✦ My Favorite Way to Organize Garden Seeds

Anna Chesley
Anna Chesley is a freelance writer living a homestead lifestyle, with a special love for family travel, old books, vintage skills, and seaside living. In addition to founding Salt In My Coffee, she runs the website, New England Family Life, as well as The 1800's Housewife, a website devoted to re-creating authentic 1800's recipes.

Ginger says
This sounds like a great idea. My only question would be, does the new concrete adhere to the original concrete firmly.?
Anna Chesley says
It really does! I’ve been using (and abusing!) mine for several years now, and most have spent at least one winter outside, freezing and thawing repeatedly. Those bottoms are still sound and perfectly intact!
That was a great question and I hope this update helps!
Karen Merhalski says
I have seen these somewhere else, and wanted to make them but didn't know how to block the bottom so that I can just plant inside of them instead of just placing a plant in them. Thank you for showing us how to do this! You are just so talented Anna! Yours are just beautiful!
Christine says
Beautiful! What a great idea!
Anna says
Thank you so much! I really had a blast making these!